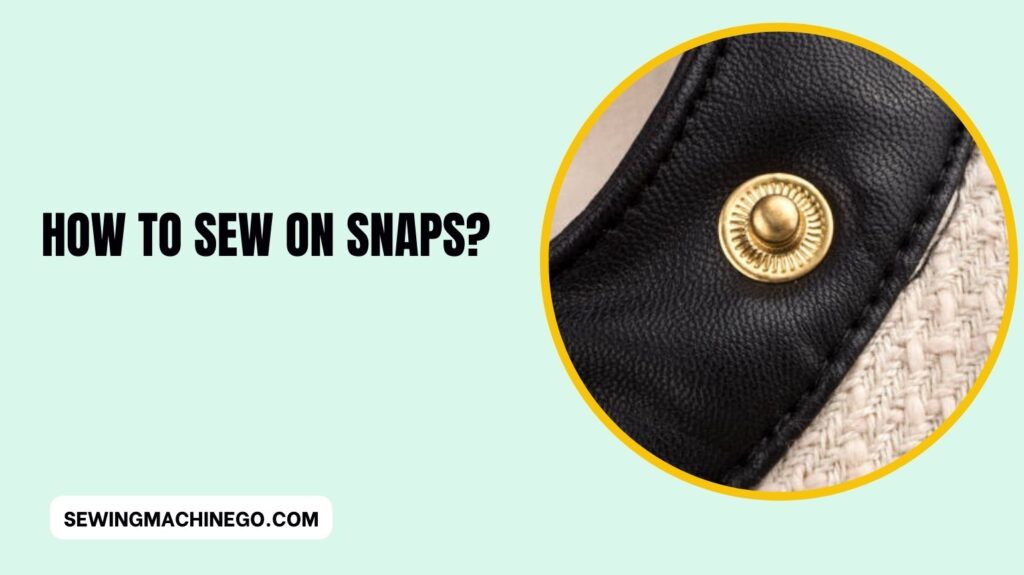
How to Sew on Snaps? Easy Steps Guide In 2023
Sewing snaps onto fabric may seem like a small detail, but it can make a significant difference in the functionality and aesthetic appeal of your projects.
How to Sew on Snaps? Whether you’re a seasoned sewing enthusiast or just starting, understanding the art of attaching snaps can elevate your creations.
Let’s dive into the world of sewing snaps and unravel the techniques to master this essential skill.
Introduction to Sewing Snaps
Sewing snaps serves as a versatile way to fasten garments, accessories, or home décor items. The flexibility and ease of use make snaps a popular choice among crafters.
Incorporating them into your sewing repertoire can enhance both the functionality and visual appeal of your creations.
Types of Snaps
Before delving into sewing, it’s crucial to explore the diverse range of snaps available. From traditional metal snaps to plastic and sew-on varieties, each type has its unique advantages and applications.
Understanding these differences helps in choosing the right snap for your specific project.
1. Metal Snaps
- Standard Metal Snaps: These are classic snaps available in different finishes like brass, nickel, or gunmetal. They offer durability and a professional finish.
- Spring Snaps: Known for their strong grip, these snaps are suitable for heavy-duty applications, such as bags or outdoor gear.
2. Plastic Snaps
- Colorful Plastic Snaps: Ideal for kid’s clothing or crafts, these snaps come in vibrant colors and are easy to use. They offer a lightweight and playful touch.
- Transparent Snaps: Often used in discreet closures, these snaps blend well with transparent or sheer fabrics.
3. Sew-On Snaps
- Sew-On Metal Snaps: These require stitching onto the fabric and provide a secure closure. They are suitable for garments requiring a subtle closure.
4. Magnetic Snaps
- Hidden Magnetic Snaps: Providing a seamless and silent closure, these snaps are popular in bags and purses. They offer convenience and ease of use.
5. Pearl Snaps
- Decorative Pearl Snaps: These decorative snaps add a vintage or Western touch to clothing or accessories. They come in various colors and designs.
6. Ring-Spring Snaps
- Ring-Spring Fasteners: Featuring a spring ring for secure closure, these snaps are used in applications requiring quick release and attachment.
7. Adhesive Snaps
- Adhesive Fabric Snaps: These snaps eliminate the need for sewing or tools, adhering directly to the fabric. They work well for temporary closures or crafts.
8. Specialty Snaps
- Heavy-Duty Snaps: Designed for industrial applications or heavy fabrics, these snaps ensure durability and strength.
- Decorative Rhinestone Snaps: Offering a touch of glamour, these decorative snaps add sparkle to clothing or accessories.
9. Combination Snaps
- Combination Metal and Plastic Snaps: Combining the durability of metal with the versatility of plastic, these snaps cater to various needs.
10. Snap Fastener Kits
- Assorted Snap Kits: These kits include a variety of snap types, sizes, and tools, providing convenience for different projects.
Understanding the diverse range of snaps empowers you to choose the right type based on functionality, aesthetic appeal, and the specific requirements of your sewing project.
Tools and Materials Required
Sewing snaps efficiently requires specific tools and materials to ensure a seamless process and a secure attachment.
Here’s a comprehensive list of what you’ll need:
Tools:
- Snap Setter: A tool specifically designed for attaching snaps securely onto fabric.
- Hammer: For applying pressure to the snap setter and securing the snaps in place.
- Awl or Hole Punch: To create precise holes in the fabric for the snaps.
- Marking Pen or Chalk: For marking the fabric to indicate the placement of snaps.
- Scissors: To cut the fabric or thread.
- Needle and Thread: To stitch sew-on snaps or for any necessary reinforcement.
- Pliers: Handy for holding snaps in place or adjusting certain types of snaps.
- Iron (Optional): For applying heat if using adhesive snaps or for fabric preparation.
Materials:
- Snaps: Choose the type of snaps based on your project’s requirements.
- Fabric: The material onto which you’ll be attaching the snaps.
- Interfacing (Optional): For providing additional support to the fabric, especially for thin or delicate materials.
- Adhesive (If using adhesive snaps): Ensure it’s suitable for the fabric type and follows safety instructions.
- Thread: Match the thread color to the fabric for a seamless finish.
- Rubber Mallet (Optional): If working with heavy-duty snaps, a rubber mallet can help with applying pressure evenly.
Having these tools and materials ready before starting the process saves time and ensures a smoother experience while attaching snaps. Additionally, it guarantees a sturdy and professional finish to your sewing projects.
Preparing the Fabric
Preparing the fabric marks the initial step in attaching snaps. Properly marking the placement and choosing suitable fabric play a pivotal role in ensuring a durable attachment.
Step-by-Step Guide to Sewing on Snaps
Attaching snaps to fabric involves a systematic process that ensures a secure and professional finish.
Follow these steps to sew on snaps effectively:
1. Prepare the Fabric
- Lay out the fabric on a flat surface and ensure it’s clean and free from wrinkles.
- Consider adding interfacing to the fabric for extra support, especially if it’s thin or delicate.
2. Mark Snap Placement
- Use a marking pen or chalk to mark where you want to place the snaps. Ensure the markings are precise and align correctly for a snug fit.
3. Create Holes
- Using an awl or hole punch, carefully create holes at the marked spots on the fabric. The holes should be just big enough to accommodate the snap prongs.
4. Prepare the Snaps
- If using sew-on snaps, thread a needle with matching thread and knot the end.
- For other types of snaps, prepare the male and female parts accordingly.
5. Sewing Sew-On Snaps
- Position the sew-on snap part (male or female) on the fabric and start stitching around the edges of the snap through the holes.
- Ensure the stitches are secure and tight to hold the snap firmly in place.
- Repeat the process for the corresponding snap part on the opposite side of the fabric.
6. Attaching Other Snap Types
- For other snap types, follow the instructions provided with the snap setter tool.
- Place the male or female part on one side of the fabric and the corresponding part on the opposite side.
- Use the snap setter tool along with a hammer to secure the snaps firmly in place by applying pressure.
7. Finishing Touches
- After attaching both parts of the snaps, test the closure to ensure it aligns properly and securely fastens.
- Trim any excess thread and tidy up the fabric around the snap attachment for a neat finish.
8. Optional Reinforcement
- If required, reinforce the snaps by stitching around the snap attachment for added durability, especially for frequently used items.
9. Final Inspection
- Inspect the snaps to ensure they are securely attached and the closure functions smoothly without any loose parts.
10. Pressing (If needed)
- Optionally, press the fabric around the snaps with an iron on a low heat setting to ensure a flat and smooth finish.
By following these step-by-step instructions, you can confidently attach snaps to your fabric, ensuring a secure closure and a polished look to your sewing projects.
Tips for Seamless Snap Attachment
Avoiding common mistakes and ensuring a snug fit adds to the longevity of snaps. Implementing these tips guarantees a secure and durable attachment.
- Accurate Marking: Ensure precise marking of snap placement on the fabric to avoid misalignment.
- Sturdy Holes: Create clean and appropriately sized holes to fit the snap prongs snugly.
- Secure Stitching: For sew-on snaps, stitch firmly and evenly around the edges for a strong attachment.
- Proper Pressure: Apply consistent pressure when using snap setter tools to avoid uneven or loose attachments.
- Test Closure: Always test the closure after attachment to guarantee a secure and aligned fit.
- Reinforcement: Consider reinforcing the snap attachment with additional stitches for high-use items.
- Trim Excess: Trim excess thread or fabric around the snap to maintain a clean finish.
- Optional Ironing: Lightly press around the snap area with an iron for a smooth, finished look.
Creative Ways to Use Snaps
Snaps aren’t limited to just closures; they offer innovative possibilities. Exploring DIY projects and unique uses expands the horizons of snap sewing.
Snaps, beyond their conventional use as closures, offer a realm of creative possibilities in sewing projects. Consider incorporating snaps in unexpected ways, such as:
- Convertible Garments: Design clothing pieces with detachable sleeves or hems using snaps, offering versatility in style and function.
- Mix-and-Match Accessories: Create interchangeable elements for accessories like bags or hats, allowing users to swap designs effortlessly.
- Modular Home Décor: Craft decorative items like pillows or curtains with snap-on embellishments for easy customization and seasonal changes.
- Interactive Children’s Clothing: Integrate snaps into educational clothing, allowing kids to learn by matching shapes, colors, or numbers.
- Adjustable Fit Apparel: Design clothing with adjustable waistbands or cuffs using snaps for a personalized and comfortable fit.
- Functional Embellishments: Attach snap-on pockets, patches, or trims to garments, offering both practicality and style.
- Adaptive Clothing: Create adaptive clothing for individuals with specific needs, using snaps for easy dressing and accessibility.
- Mixing Textures: Experiment with mixing different fabric textures and patterns that can be interchanged using snap attachments.
Embracing snaps in these innovative ways not only adds functionality but also sparks creativity, enabling unique and personalized expressions in sewing projects.
Maintaining Sewn Snaps
Caring for sewn snaps is vital for their longevity. Proper cleaning methods and maintenance tips keep your creations looking impeccable.
Troubleshooting Snap Sewing Issues
Encountering problems while sewing snaps is common. Knowing how to troubleshoot issues like loose snaps or misalignment saves time and effort.
- Loose Snap: If a snap feels loose, try reinforcing it by adding more stitches around the attachment to secure it better.
- Misalignment: To address misaligned snaps, carefully remove the snap and reposition it, ensuring accurate placement before reattaching.
- Uneven Closure: If snaps don’t align or close smoothly, check for fabric thickness or snap position inconsistencies and adjust accordingly.
- Prong Misfit: Ensure the prongs of the snap-fit snugly into the holes. If not, adjust the hole size or realign the fabric for a better fit.
- Stitching Errors: Double-check your stitching around sew-on snaps; loose or uneven stitching might cause instability in the attachment.
- Snap Damage: If a snap is damaged during attachment, replace it with a new one to ensure a secure closure.
- Tool Issues: In case of tool-related problems, like the snap setter not applying enough pressure, consider using a different tool or adjusting the pressure applied.
- Fabric Compatibility: Ensure the fabric is suitable for the type of snap being used; delicate fabrics might require special attention to avoid damage during attachment.
Safety Measures
When working on sewing projects involving snaps, prioritizing safety is crucial. To ensure a secure and accident-free environment, several precautions should be observed.
Always wear protective gear, such as safety glasses, especially when handling tools like hammers or awls. Use finger guards or thimbles to shield your hands from potential injuries when handling needles or employing pliers.
Additionally, maintain a well-organized workspace with ample lighting to minimize risks. Keep sharp tools and small snap components away from children’s reach to prevent accidents.
When using heat, like an iron, handle it cautiously to avoid burns, and always adhere to safety guidelines. Furthermore, secure the fabric in place to prevent slippage and any inadvertent mishaps while attaching snaps.
Maintaining cleanliness and promptly cleaning spills, especially with adhesive or other chemicals, further ensures a safe and controlled work environment.
Exploring Snap Alternatives
When considering alternatives to snaps in sewing projects, various fastening options offer diverse functionalities. Buttons, with their classic charm, present a versatile choice allowing for creativity in design and placement.
Zippers offer a secure closure for larger openings like jackets or bags and provide a sleek, modern finish.
Hook and loop fasteners, commonly known as Velcro, offer adjustable closures suitable for repetitive opening and closing.
For a decorative touch, consider using ribbons or ties, providing a whimsical and customizable closure method.
Each alternative presents distinct advantages, catering to specific needs and design preferences, and allowing for unique and innovative solutions beyond traditional snap closures.
Sewing Snaps for Different Garments
Tailoring snaps for specific garments requires a nuanced approach. Understanding the nuances of different clothing items ensures a perfect fit.
Customizing Snaps
Customizing snaps adds a personalized touch to your sewing projects, offering a unique opportunity to infuse creativity and individuality.
Experiment with various embellishments, such as fabric coverings, decorative buttons, or rhinestones, to customize the appearance of snaps.
You can also consider painting or adding small artistic designs to the snap’s surface for a distinctive look.
This customization allows you to match snaps perfectly with the fabric or to create standout accents, elevating the overall aesthetic appeal of your creations.
Environmental Impact of Snaps
The use of snaps in sewing projects comes with environmental considerations worth noting. While these fasteners offer convenience and versatility, their environmental impact is multifaceted.
The production of snaps, especially those made from non-biodegradable materials like plastics or metals, contributes to resource consumption and waste generation.
Improper disposal of snaps at the end of a product’s life cycle adds to landfill accumulation and potential environmental harm.
However, efforts are underway to create eco-friendly snap alternatives, exploring biodegradable materials and sustainable manufacturing processes.
Conscious consumer choices, like opting for reusable snaps or repurposing existing ones, can significantly reduce the environmental footprint associated with snap usage, fostering a more sustainable approach to sewing and crafting.
People also ask – How to Sew on Snaps?
Is there a correct way to sew snaps?
While there isn’t a singular “correct” way to sew snaps, following a systematic process ensures a secure attachment.
It involves precise marking of snap placement, creating appropriate holes, and stitching or setting the snaps firmly onto the fabric.
Accuracy in positioning, ensuring a snug fit, and reinforcing the attachment as needed are key aspects of a successful and durable snap sewing process.
How do you attach snaps?
Attaching snaps involves several steps:
Marking: Mark where you want the snaps to sit on the fabric.
Create Holes: Use an awl or punch to make holes at the marked spots.
Prepare Snaps: Position male and female parts accordingly.
Sewing or Setting: Stitch sew-on snaps or use a snap setter tool with a hammer to secure snaps firmly in place.
Test Closure: Ensure the snaps align and securely fasten before finishing.
How do you hide sew on snaps?
Hiding sew-on snaps involves concealing them within the fabric layers. This can be done by sewing them underneath a facing, lining, or additional fabric layer,
ensuring they remain functional while remaining hidden from view on the surface of the garment or item.
How do you install sewing snaps?
To install sewing snaps:
Mark Placement: Mark where the snaps will be positioned on the fabric.
Create Holes: Use an awl or punch to create holes at the marked spots.
Position Snaps: Place the male and female parts on either side of the fabric.
Sew Snaps: Stitch around the edges of the snap components securely onto the fabric.
Test Closure: Ensure the snaps align and securely fasten before completing the installation.
Conclusion
In Conclusion, Mastering the art of sewing on snaps is a valuable skill. With patience and practice, you can seamlessly attach snaps to your garments, adding functionality and style.
Remember to choose the right size and type of snap, follow the step-by-step process diligently, and test the snaps for durability.
By mastering this technique, you’ll elevate your sewing prowess and have the satisfaction of creating garments with professional finishes. Happy sewing!

Hi, I am Alice, and I am your perfect guide to the world of sewing machines. With over 10 years of experience in the sewing industry, I am passionate about sharing my knowledge and expertise to help you make the most of your sewing journey. about me