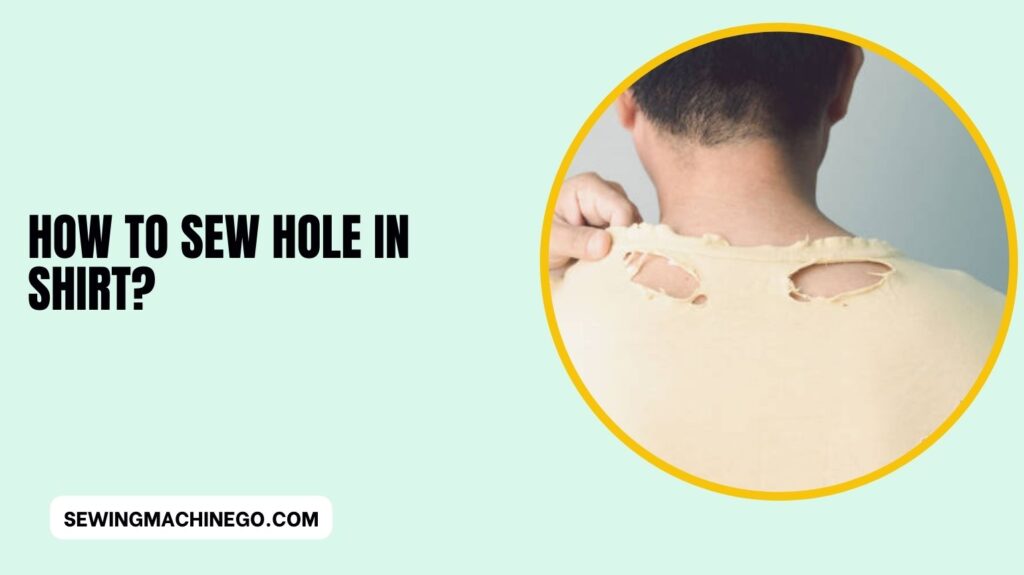
How to Sew Hole In Shirt? (Easy Steps Guides) Of 2023
How to Sew Hole In Shirt? Embarking on the journey to mend a hole in a shirt is a practical and empowering skill that breathes new life into beloved garments.
Whether it’s a small tear or a larger hole, learning how to skillfully repair it not only saves the shirt but also allows you to add your unique touch to its story.
In this guide, we’ll explore the step-by-step process to mend a hole in a shirt, equipping you with the techniques to seamlessly repair the fabric and restore its functionality.
So, gather your materials, thread your needle, and let’s dive into the fulfilling art of shirt mending.
Assessing the Damage
Before diving into the repair process, it’s crucial to assess the type and size of the hole. Different holes may require distinct approaches, and understanding the damage is the first step to a successful mend.
Gathering Supplies
To embark on this DIY journey, gather your sewing essentials. From needles to threads, make sure you have the right tools for the job.
Additionally, familiarize yourself with the fabrics and threads suitable for the specific shirt you’re repairing.
Preparation Steps
Proper preparation ensures a seamless repair. Wash and iron your shirt to create a clean canvas for mending. Use pins to secure the hole, preventing any shifts during the sewing process.
Before diving into the actual sewing process, it’s crucial to prepare your shirt for a successful repair. This stage sets the foundation for a seamless mend and ensures that your efforts yield long-lasting results.
1. Clean Your Shirt Properly
Begin by giving your shirt a thorough cleaning. Washing it removes any dirt, grime, or oils that might interfere with the sewing process.
Follow the care instructions on the shirt’s label to avoid any unintentional damage during washing.
2. Ironing for a Smooth Surface
Once clean, iron your shirt to create a smooth and wrinkle-free surface. A well-ironed shirt provides a clean canvas for your repair work, making it easier to assess the damage and execute precise stitches.
3. Pin the Hole Securely
Identify the location of the hole and use straight pins to secure the fabric around it.
Pinning serves a dual purpose – it prevents the hole from widening during the repair and ensures that the fabric stays in place, allowing for more accurate stitching.
4. Evaluate the Fabric’s Condition
Take a moment to assess the overall condition of the fabric surrounding the hole. Check for any fraying or weakened areas.
Understanding the fabric’s state helps in determining the appropriate stitch and reinforcement needed for a durable repair.
5. Gather Necessary Tools and Materials
Before you start sewing, ensure you have all the necessary tools and materials at your disposal.
This includes needles, threads matching the shirt’s color, and any additional supplies needed for specific repair techniques you plan to use.
6. Choose the Right Thread and Needle
Select a thread that matches the color and weight of your shirt. Additionally, choose a needle appropriate for the fabric. A finer needle is suitable for delicate fabrics, while a stronger needle may be needed for thicker materials.
7. Create a Comfortable Workspace
Set up a comfortable and well-lit workspace. A good lighting setup ensures that you can see the details clearly, reducing the chances of making mistakes.
Arrange your tools in an organized manner for easy access during the sewing process.
8. Refer to the Repair Plan
If you’ve identified multiple holes or different types of damage, refer back to your repair plan. This ensures that you follow a systematic approach and don’t miss any crucial steps in the mending process.
9. Take Your Time
Rome wasn’t built in a day, and neither should your shirt repair. Take your time during the preparation steps, as a well-prepared shirt is more likely to result in a successful and aesthetically pleasing mend.
Choosing the Right Stitch
When it comes to sewing a hole in a shirt, selecting the right stitch is crucial for a seamless and durable repair. Different stitches serve various purposes, ensuring both functionality and aesthetics in the mend.
For smaller holes or tears, a basic running stitch or a whip stitch works wonders, offering a quick and straightforward solution.
However, for larger holes, employing a patch using a satin stitch or a blanket stitch not only reinforces the area but also adds a decorative element to the repair.
By understanding the nature of the hole and the fabric, choosing the appropriate stitch becomes the key to a successful and nearly invisible mend in your shirt.
Basic Hand Sewing Techniques
Basic hand-sewing techniques form the foundation of any sewing project, allowing you to create durable and precise stitches by hand.
The running stitch, a simple in-and-out motion along the fabric, is perfect for basic seaming or basting. Backstitching,
where each stitch overlaps the previous one, creating a strong, secure seam ideal for repairs or constructing seams that require extra strength.
For finishing edges or securing hems, the whipstitch provides a neat and durable edge.
Finally, the blanket stitch, known for its decorative and functional purposes, is great for attaching patches or preventing fraying along the fabric’s edge.
Mastering these fundamental hand sewing techniques equips you with the skills necessary to tackle a wide range of sewing projects with confidence and precision.
Using a Sewing Machine
When dealing with larger holes or multiple repairs, a sewing machine can be a game-changer. Learn how to set up your machine for optimal results and streamline the mending process.
Patchwork as a Creative Solution
Turn a repair into a fashion statement by incorporating patches. Discover the art of patching and get tips on selecting and attaching patches for a stylish fix.
Dealing with Stretchy Fabrics
Sewing with stretchy fabrics requires a different approach compared to working with non-stretch materials. Here are some tips to navigate sewing stretchy fabrics:
- Use the Right Needle: Opt for a ballpoint or stretch needle designed specifically for knit or stretch fabrics. These needles have rounded tips that penetrate between the fabric’s fibers without causing damage.
- Choose Suitable Thread: Use polyester or cotton-wrapped polyester threads, as they provide elasticity and durability, accommodating the fabric’s stretch.
- Adjust Stitch Type: Use a stretch or zigzag stitch on your sewing machine. This stitch allows the seam to stretch without breaking. Experiment with stitch length and width to find the optimal setting for your fabric.
- Stabilize the Fabric: To prevent stretching while sewing, use stabilizers like tissue paper, tear-away stabilizers, or water-soluble stabilizers. These provide support during stitching and can be easily removed afterward.
- Test Before Sewing: Before stitching the actual garment, test your settings on a scrap piece of the same fabric to ensure the stitch works well and doesn’t cause puckering or stretching.
- Handle with Care: Avoid pulling or stretching the fabric while sewing. Gently guide the fabric through the machine to maintain its stretchiness and prevent distortion.
- Finishing Seams: Consider using a serger or overlock machine for finishing seams on stretchy fabrics. If using a regular sewing machine, trim seam allowances and finish them with a zigzag stitch or a mock overlock stitch to prevent fraying.
- Pressing Carefully: Use a low heat setting on your iron and avoid pressing too hard or stretching the fabric while ironing to maintain its stretchiness.
By employing these techniques, sewing with stretchy fabrics becomes more manageable, allowing you to create garments that are both comfortable and well-constructed.
Tips for Invisible Mending
Invisible mending is a delicate art that restores fabric seamlessly, making repairs virtually undetectable. Here are some tips to achieve near-invisible results:
- Match Thread and Fabric: Select a thread that closely matches the color and texture of the fabric you’re repairing. This ensures that the mending stitches blend in seamlessly.
- Use Fine Needles: Choose thin, fine needles that match the weight of the fabric. For delicate fabrics, opt for finer needles to avoid leaving noticeable puncture marks.
- Practice Precision: Take your time and work meticulously. Use small, even stitches, and avoid pulling the fabric too tight, as it might distort the repaired area.
- Match Patterns and Grain: Align patterns and the grain of the fabric accurately to maintain the original look. This attention to detail helps disguise the mended area.
- Utilize Similar Materials: If possible, use fabric scraps or remnants from the same piece to patch the hole or tear. This ensures that the repaired area matches the original fabric.
- Blend Seamlessly: When stitching, aim to mimic the original sewing technique or pattern. Whether it’s a specific stitch or the direction of sewing, replicating the original style helps camouflage the repair.
- Consider Understitching: For larger holes or tears, consider understitching the edges of the hole before stitching it together. This technique helps keep the fabric edges aligned and prevents fraying.
- Test and Adjust: Always test your technique and thread choice on a scrap piece of fabric before beginning the actual repair. This allows you to adjust your approach for the best results.
- Patience is Key: Invisible mending requires patience and attention to detail. Take breaks if needed to maintain focus and precision throughout the process.
Common Mistakes to Avoid
Sewing mishaps can happen, but knowing how to troubleshoot common errors is crucial. Discover pitfalls to avoid and troubleshoot your way to a flawless repair.
Embarking on a shirt-mending journey can be both exciting and rewarding, but it’s crucial to be aware of common pitfalls to ensure a successful repair. Here are some mistakes to steer clear of during the sewing process:
1. Ignoring Fabric Compatibility
One size does not fit all when it comes to fabrics. Avoid the mistake of using the wrong needle or thread for your shirt material. Delicate fabrics require finesse, while sturdier ones may need a more robust approach.
2. Skipping the Evaluation Step
Neglecting to thoroughly assess the fabric’s condition before sewing is a common mistake. Identify weak areas surrounding the hole, and address them during the repair to prevent further damage.
3. Rushing the Preparation Phase
Preparation is key to a successful repair. Skipping steps like washing, ironing, or securing the fabric with pins can result in a messy and less effective mend. Take the time to prepare your shirt properly.
4. Overlooking Thread Color Matching
Mismatched thread color can be a glaring mistake in shirt repairs. Always use thread that closely matches the color of your shirt to create a seamless finish. This attention to detail enhances the overall aesthetic.
5. Neglecting Reinforcement Stitches
In the pursuit of a quick fix, some may overlook the importance of reinforcement stitches. Reinforcing the repaired area with additional stitches ensures longevity and prevents the hole from reopening.
6. Using Incorrect Stitch Techniques
Different fabrics require different stitching techniques. Using the wrong stitch can lead to puckering, unraveling, or a generally unsightly repair. Research and choose the appropriate stitch for your specific shirt material.
7. Not Testing on Scrap Fabric
Before diving into the actual repair, it’s wise to practice your chosen stitches on a scrap piece of fabric. This helps you gauge the tension, stitch length, and overall sewing technique before working on the actual shirt.
8. Neglecting Thread Tension Adjustment
If you’re using a sewing machine, overlooking proper thread tension adjustment is a common mistake. Incorrect tension can lead to uneven stitches and compromise the overall quality of the repair. Refer to your machine’s manual for guidance.
9. Ignoring Fabric Grainlines
The fabric has a natural grain that affects how it drapes and stretches. Ignoring this grainline when sewing can result in a distorted appearance post-repair. Always align your fabric according to its grain for a seamless finish.
10. Neglecting Care Instructions After Repair
Your mended shirt deserves special care. Neglecting to follow appropriate care instructions, such as washing and storing guidelines, may lead to premature wear and tear, undoing your hard work.
Caring for Repaired Shirts
Once your shirt is back in action, it’s essential to care for it properly. Learn about washing and storing guidelines to maximize the lifespan of your mended clothing.
Environmental Impact of Sewing
In a world striving for sustainability, discover how sewing can contribute to reducing the environmental impact of clothing. Embrace sustainable practices and become a conscious consumer.
Empowering DIY Culture
Empowering DIY culture signifies a shift toward self-reliance, creativity, and skill-building. It encourages individuals to take control of their projects, from repairs to creations, fostering a sense of empowerment and independence.
Through DIY endeavors, people discover their capabilities, honing skills that transcend traditional boundaries.
This culture fosters:
- Self-Sufficiency: DIY projects enable individuals to address needs and challenges independently, reducing reliance on external services or products.
- Creativity and Innovation: It encourages experimentation and innovation, allowing individuals to explore unconventional solutions and unique ideas.
- Skill Development: Engaging in DIY activities cultivates various skills, from basic repairs to complex craftsmanship, empowering individuals with practical abilities.
- Community and Sharing: DIY culture often thrives in communities where knowledge and skills are shared, fostering collaboration and support among like-minded individuals.
- Environmental Consciousness: Reusing, repurposing, and upcycling items align with DIY principles, promoting sustainability and reducing waste.
- Personalization and Individuality: DIY projects enable the creation of personalized, one-of-a-kind items that reflect individual tastes and preferences.
- Cost-Effectiveness: DIY endeavors can often be more cost-effective than purchasing ready-made items or hiring services, making them accessible to a wider audience.
People also ask – How to Sew Hole In Shirt?
How do you sew a hole for beginners?
Sewing a hole for beginners is a straightforward process. Follow these simple steps:
Gather Supplies: Get a needle, thread matching your fabric, and a pair of scissors.
Clean the Area: Ensure the hole is clean and free of debris.
Secure the Fabric: Use pins to stabilize the fabric around the hole.
Thread the Needle: Cut a manageable length of thread and thread your needle.
Start Stitching: Begin with a simple straight stitch, working from the outside of the hole towards the center.
Secure the End: Knot the thread securely to prevent unraveling.
Repeat if Necessary: For larger holes, repeat the process, creating a grid of stitches for added strength.
Trim Excess Thread: Trim any excess thread for a neat finish.
Press the Repair: Iron the repaired area to flatten stitches and blend them with the fabric.
Practice Patience: Take your time, and with practice, you’ll improve your skills.
How do you fix a big hole in a shirt without sewing?
Fixing a big hole in a shirt without sewing is possible with these quick steps:
Gather Materials: Grab fabric glue, an iron, and a fabric patch that matches your shirt.
Clean the Area: Ensure the hole is clean and free of loose threads or debris.
Apply Fabric Glue: Spread a thin layer of fabric glue around the edges of the hole.
Position the Patch: Place the fabric patch over the hole, pressing it firmly into the glue.
Apply Pressure: Press the patched area with a heavy object or use an iron on a low setting to activate the glue.
Let it Dry: Allow the glue to dry completely before wearing the shirt.
How to do invisible mending by hand?
To perform invisible mending by hand:
Thread Selection: Choose a thread that closely matches the color and thickness of the fabric you’re mending.
Align Edges: Place the torn edges together, ensuring they align perfectly.
Tiny Stitches: Use small, discreet stitches along the tear, stitching on one side of the fabric and then the other. Keep the stitches close together for better blending.
Match Stitch Direction: Mimic the original fabric’s weave or pattern by matching the direction of your stitches to create a seamless repair.
Secure and Knot: Finish with a small knot and secure the thread. Trim any excess carefully.
How do you fix a tear in fabric?
To fix a tear in fabric:
Clean and Trim: Trim any loose threads and clean the area around the tear.
Align Edges: Align the torn edges as closely as possible.
Hand Sewing: Use a needle and thread to sew small, neat stitches along the tear. Start and finish with a knot for security.
Apply Fabric Glue (Optional): For extra reinforcement, you can apply fabric glue along the tear before sewing. Make sure it’s suitable for the fabric type.
Press: Press the repaired area with a hot iron, following fabric care instructions.
Reinforce with Interfacing (Optional): For larger tears, apply interfacing on the backside of the fabric before sewing for added strength.
Conclusion
In conclusion, mastering the skill of sewing a hole in a shirt is a valuable tool in maintaining and extending the life of your clothing.
By following the steps outlined in this guide, you can seamlessly repair a hole, ensuring your shirt remains wearable and looks great.
Remember to choose the right needle and thread, take your time with each stitch, and blend the repair seamlessly with the fabric.
With a little practice and attention to detail, you can breathe new life into your favorite shirts and embrace a sustainable approach to fashion.

Hi, I am Alice, and I am your perfect guide to the world of sewing machines. With over 10 years of experience in the sewing industry, I am passionate about sharing my knowledge and expertise to help you make the most of your sewing journey. about me